|
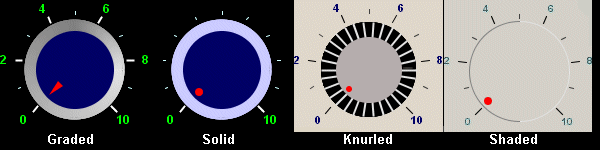
The edge rim panel allows you to define a graphical rim to surround a knob or meter. It allows a number of different rim type options -
- None - No rim shown at all
- Thin - A rim of a single colour (it doesnt need to be thin)
- Shaded - A two colour rim with the two colours changing at the shade angle and being displayed for 180 degrees.
- Graded - The colour of the rim is graded from one colour to another in either direction from the shade angle.
- Knurled - This creates the impression of ribs (known as knurls) such as you might see on a radio knob.
An example of each of these rims is shown in the diagram below -
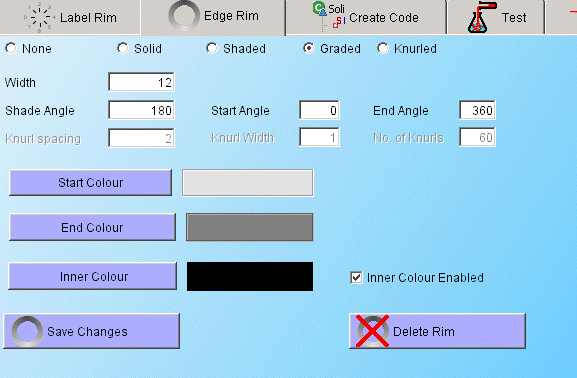
There are a number of different fields on the Panel which relate to the different settings that can be changed to alter the appearance of the edge rim. Depending on the rim type chosen these may or may not be enabled or may be named differently. All of the angles follow the Java convention with 0 degrees being at 3 oclock - see section on angles here .
- Rim Width - the width of the rim in pixels
- Shade Angle - the angle representing the point of shade on the rim
- Start Angle - the angle at which the rim starts
- End Angle - the angle at which the rim ends
- Main Colour - In the case of a shaded rim this will be the main colour, in a graded rim it will be the colour at the start angle and in the case of a knurled rim it will be the colour of the knurls
- Secondary Colour - In the case of a shaded rim this will be the shade colour, in a graded rim it will be the colour at the end angle and in the case of a knurled rim it will be the colour of the background on which the knurls are drawn.
- Inner Colour - This is the colour used to fill the centre of the edge rim
- Knurl spacing - The distance in pixels between the knurls and the outer edge of the rim
- Knurl width - The width of the knurls in pixels
- No of Knurls - The number of knurls to be positioned round the rim
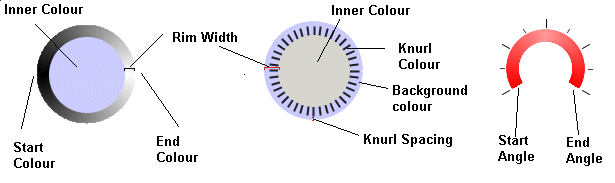
The relationship between each of those attributes and how they contribute to the final appearance is shown in the diagram below.
When designing the edge there are a number of factors to be borne in mind. The graded rim provides a very high quality graphic rim. The creation of this and its repainting will be slow. On high speed processors (>2.6 GHz) this should not be a problem but if you are creating applications for lower performance machines you might be better to use a high quality predefined image as a background (see below). Remember also that the high quality rendering will only show on machines with a high colour depth (16 bit and more). You can of course use the knob creator to generate the pre-defined image.
Note that the 'Delete rim' button will not actually get rid of your work on the edge rim. You can put the rim back on the illustrative display (and into the generated code) simply by pressing the 'Save Changes' button again.
|